User Guide
This user guide explains how to use the application and customize it.
-
Record screen
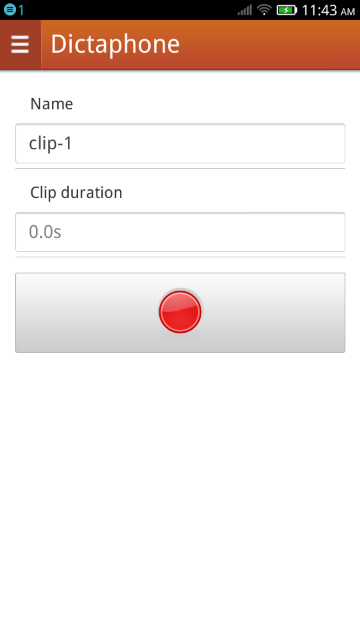
When you launch the application the first time, the application starts at the record screen. The record screen lets you record a new sound clip. It displays the clip name (a default value is proposed for that name), the length of that sound clip (with a resolution of 0.1 second, updated in real time during the recording), and record
 button. Simply hit the record button to start the recording: it
will change to a stop button
button. Simply hit the record button to start the recording: it
will change to a stop button  . Hit the stop button to stop the recording. The application will
transition automatically to the the clip list screen.
. Hit the stop button to stop the recording. The application will
transition automatically to the the clip list screen.When you record your first clip, the browser displays a dialog asking for the permission to use the system microphone. If you give permission, the recording will proceed and the record button will change to the stop button, otherwise nothing will happen. The permission you give remains valid for the whole session. If you make other recordings within the same session, permission will not be asked again; if you quit the application and launch it again though, the dialog will appear again for the first recording.
Depending upon browsers, once your sound clips total a storage size greater than a given threshold (50MB for Firefox), you will be asked, during the recording, to allow the application storage to grow beyond this limit. If you refuse this permission, the recording will terminate as if the stop button had been pressed. Once the threshold of 50MB is exceeded, the permission will not be asked again.
You do not have to remain on the record screen when a recording is taking place. You may still use other screens in the application, and play another clip while the first one is recording for instance. You will however need to return to the record screen for that clip and stop the recording before you can listen to the clip. You can easily tell which clips are being recorded because they feature an animated recording symbol
 and have a
real-time updated duration in the clip list screen.
and have a
real-time updated duration in the clip list screen.
-
Play screen
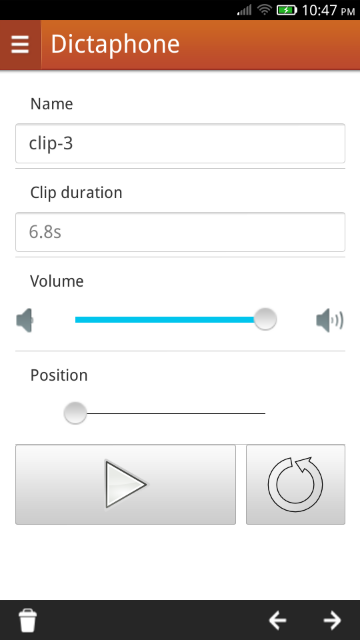
The play screen lets you listen to a recorded clip. It displays the clip name, the clip duration, a seek bar to control the volume, a seek bar to control the replay position in the clip a play button
 and
a loop toggle button
and
a loop toggle button  .
A toolbar at the bottom displays a delete clip button, and a previous / next pair of buttons
.
A toolbar at the bottom displays a delete clip button, and a previous / next pair of buttonsTo play the clip, simply hit the play button. It changes to a pause button
 and playback
begins. The position seek bar is updated in real time to reflect the part of the clip which is
currently being replayed. At the end of the clip, the pause button reverts to a play button
and the position seek bar is reset at the beginning of the clip.
and playback
begins. The position seek bar is updated in real time to reflect the part of the clip which is
currently being replayed. At the end of the clip, the pause button reverts to a play button
and the position seek bar is reset at the beginning of the clip.This behavior can be changed by clicking the loop toggle button
.
When that button is pressed down and the end of the clip is reached, they replay will
automatically start again from the beginning, until the pause button is pressed or the loop toggle
button is restored to its not-pressed state.You can change the position seek bar either before the replay has begun (in which case the replay will begin at this position), or while the replay is proceeding (in which case the replay will stop while you drag the seek bar button and resume at the new position when you release the button).
You can change the volume of the replay, either before it has begun and while it is proceeding.
You do not have to remain on the play screen when a replay is taking place. You may still use other screens in the application, and play another clip while the first one is playing for instance, in which case the two replays will be mixed together by the Web Audio API. You may want however to return to the play screen for that clip and stop the replay before it automatically terminates. You can easily tell which clips are being recorded because they feature an animated play symbol
 in the clip list screen.
You can rename the clip simply by editing the clip name.
You can delete the clip by clicking on the delete clip button in the toolbar. A confirmation will be asked before erasing the clip. You will be returned to the clip screen list and the clip will be removed from the list and erased.
To navigate quickly between sound clips, a previous / next pair of button cycles through the clips in the available clip list.
-
Clip list screen
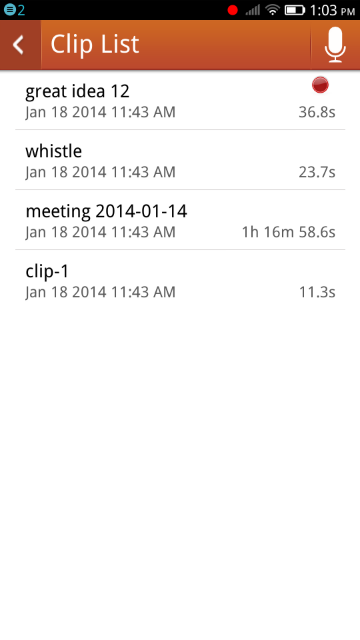
The clip screen list displays the name of all the sound clips available in the application. When you launch the application the first time, the application starts at the clip screen, unless no clips are available in which case it starts at the record screen.
For each entry in the list, the clip name, recording date and length is displayed. If the clip is currently being recorded, an animated recording symbol
is displayed for that entry and its duration is updated in real-time. If the clip
is currently being replayed, an animated play symbol
for that entry is displayed.Clicking on an entry in the list either displays the play screen for that clip (in most cases) or the record screen (if that clip currently is being recorded).
The entries in the list are sorted by replay date (the most recently played clip appears first), unless the clip has never been replayed, in which case its creation date is taken into account.
-
Menu screen
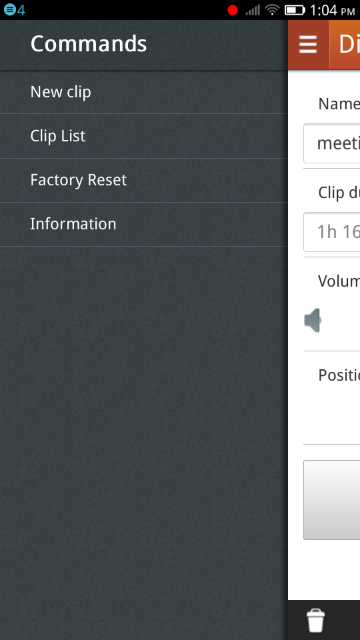
This screen give access to the application options
- New clip
- This command displays the record screen. If a clip is already being recorded, this command starts a new record screen to create a second recording in parallel.
- Clip list
- This command displays the list of all available sound clips. From this list, it is possible to play existing clips or access clip being recorded.
- Factory Reset
- This command wipes out all the sound clips you have created, and restores the application in its original state, as if just installed and never used before. Confirmation is asked first. A progression screen is displayed while the data is being erased.
- Information
- This command displays the information screen. The information screen displays technical and legal information about the application, and lets you install the application on your device if the application is run from its hosted location.
-
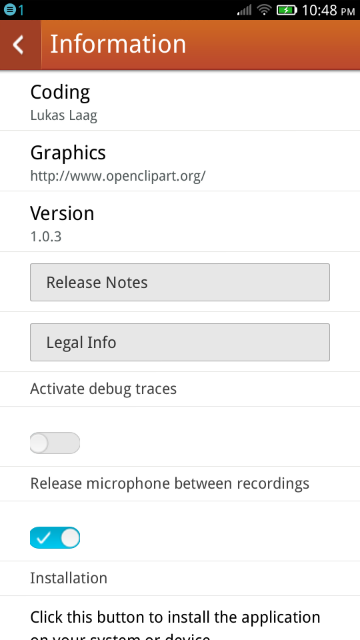
Information screen
The information screen lets you change application settings and browse technical and legal information about the application.
Two settings are available from the console: the debug log setting and the release microphone setting
The debug log setting should appeal only to software developers. It will output debug traces to the internal log of the device, which can be useful to troubleshot difficult to understand bugs.
The release microphone setting can be used to change how the application manages permissions for using the microphone. By default, the application will ask for the permission to activate the microphone the first time you record a clip. It keeps that permission for the rest of the session, even when it is not recording anything, to avoid asking you for the permission again. One annoying side effect is that devices will often display an icon saying that the microphone is active, even if it is not recording, because the permission has not been returned to the operating system. This can be perceived as confusing. If you prefer the application to deactivate the microphone when the app is not actively recording, and be explicitely asked to activate the microphone for each recording, check this setting.
Depending on how the application has been installed, this screen may also be used to install or update the application.
If the packaged version of the application has been installed (FirefoxOS), installation is not necessary and updates are managed through the built-in FirefoxOS update manager.
On the other hand, if the application has been launched from the web site (hosted version), this screen also presents an 'Install' button for browsers which support it. Clicking this button creates a shortcut on the device / computer 'desktop' from which the application can be accessed directly. Note that since the application uses the HTML5 appcache, the application can still be played offline even if it is not installed. The 'Install' button will be replaced by an 'Update' button if a newer version is available. Because of the HTML5 application cache, the new version will automatically be downloaded and installed even if you do not click this button. However, some of the new features may not be available if they require new access permissions, since new access permissions always require your approval. Clicking the 'Update' button launches the OS update / approval screen.


